20 Dec 2014 Another Straightedge Guide
 “Straight Edge Guide for a Router” Create an Inexpensive Guide for Your Router.
A few weeks ago I did a blog on the shop made jig to break down large boards with a circular saw. I use a similar jig to make straight cuts with a router. You can combine the two straightedge guides into one for your circular saw and your router, but I actually have two different ones.
As I indicated in the previous blog, my tool of choice is the table saw for cutting straight edges, but when a board or panel is too large I resort to a circular saw. Same can be said for dados, but in the event the piece is too large to handle on the table saw I rely on my router. Just like with the circular saw I need a way to control the path of the tool to get an accurate cut. That's why I build a straight-edge jig.
Many of the commercially developed straightedges guides can be used for a router as well as a circular saw. The most important feature of a guide like this is a low profile to allow the tool to slide along the guide without interference. There are a lot of different guides available and most of them are pretty good, but the biggest draw-back is the requirement to go through a setup routine every time you need to make a cut. One way to make this process easier is to create a couple of set-up aids. First thing you should do is determine if the guide is truly square to your work. Do this by placing a speed square against the edge of the guides you secure it to the panel. Next you must account for the offset between the edge of the guide and the cutting edge of the router bit or saw blade. To simplify this, you can make setup blocks for your circular saw and router. These blocks are sized to match the distance between the edge of the tool base and the edge of the bit or blade. Add cleats to the block so it can be used to both position and square the straightedge guide in one easy step. The time you put into creating accurate aids to set up your straightedge will be well worth it, but it's also easy to make your own straight edge specific to your tools with the set up aids built in. This is particularly useful if you work with a lot of large panels.
Build your own straightedge guide
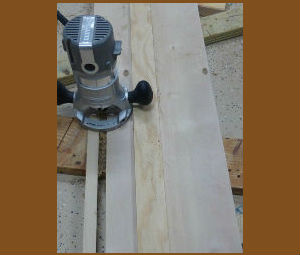
To make your own straightedge guide for a router, cut a hardboard base to the length you need and extra-wide (pic 1). Then mount a fence to the top of with glue and screws (pic 2). Use a low profile piece of wood ¼" or ½" (if ½" fits your tools it makes a sturdier guide) to keep it from interfering with the movement of your router. Next trim the edges of the base with the router you'll use with the guide (pic 3). Remember, the edge cut with the router will only work with the bit it's cut with; you can't use a ½" straight bit with the guide if you cut the guide with a ¾" bit. Once the guide is cut, the edge will line up with the cut line on your parts every time. You can make one guide for the circular saw and the router by cutting the hardwood piece wide enough for both tools and a guide (slightly wider). Then cut one edge with your circular saw and the other with your router. It is a good idea to mark on the guide which tool it was made with and the size of the bit you used.


